Sunday, September 29, 2013

The Dinner Party: The Recipes

WAIT.  STOP.

If you haven't read all about our fabulous Pinterest-inspired dinner party, go read all about that first here.

I'll wait.  Really.  Go on.

Okay.  So, I promised you some recipes. Therefore, I bring you; Easiest Ever Meatballs, Addicting Ranch Crackers, Caprese Pops, Easy Onion Dip, Rosemary Olive Oil Bread, Peach Sangria, and BlueberryPom Sangria. Maybe if you're super-duper sweet to Courtney, go visit her blog and ask real nicely, maybe she'll share the recipe for the hot ham and cheese pinwheels she brought.

Most of the recipes are super simple.  I wasn't going for overly complicated.  I was going for delicious comfort food.  Since we all lingered in my kitchen as though tied to the food by an invisible string, I think I was successful.  

The Recipes

Easiest Ever Meatballs

Ingredients:
1 bag of your favorite frozen meatballs
1 jar grape jelly

2 bottles chili sauce (can be Heinz, but I made it with the cheap stuff and it was just as good)


Directions:
Whisk the jelly and the chili sauce together.  Toss everything in the crockpot.  The meatballs do not need to be thawed first.  Cook on low all day, or on high 4-5 hours if pressed for time.  Knock everyone's socks off when you tell them what the ingredients are.  I sadly did not manage to get a picture of the meatballs because they went that fast.

Addicting Ranch Crackers

Ingredients:
2 bags oyster crackers
2 packets dry ranch dressing mix
1/2 cup oil (for once I used canola oil and not coconut)
Dill, sea salt, and garlic to taste

Instructions:
Preheat oven to 250.  Mix all ingredients together in a 9x13 glass baking dish, mixing well to coat all crackers.  Bake for 20 minutes, stirring every five minutes.  Let cool before serving.


Caprese Pops

Ingredients:
One 24-oz tub Formaggio Mozzarella Cheese (in marinade)
1/2 pound cherry or grape tomatoes, halved
Toothpicks

Instructions:
Cut the tomatoes and cheese balls in half.  Place one half of a tomato flat side down, so the pops will stand up straight.  Pierce it with a toothpick.  Slide half a mozz ball on to the toothpick, and follow with another tomato half so that the cheese is sandwiched between the tomatoes.  Remove to a platter.  Continue until all cheese is used.  Reserve oil marinade to be used as a dip for the rosemary olive oil bread.


Easy Onion Dip

Ingredients:
1 package Lipton French onion soup mix
1 1/2 cups plain non-fat Greek yogurt
1/2 cup low fat mayonnaise

Instructions:
Whip together the yogurt and the mayo.  Add in the soup mix and mix until well combined.  Chill 1-2 hours before serving.  This can be made with 1 cup sour cream and 1 cup mayo, but I find that this version tastes just as good, and is of course much healthier.


 Rosemary Olive Oil Bread

This is easily my favorite bread recipe.  Ever.  In the history of the planet. It's also the most complicated of all the recipes in this post.  And it STILL only took me about 2.5 hours.  I decided around three in the afternoon that I felt like making bread, and BAM. It was ready in time for the party.


Ingredients:
1 cup warm water
1 tablespoon cane sugar
2 teaspoons active dry yeast
1 teaspoon salt
2 tablespoons fresh rosemary, chopped (or 2 teaspoons dried)
¼ teaspoon Italian seasoning
¼ teaspoon freshly ground black pepper
2 tablespoon extra virgin olive oil (NOT coconut oil, for once)
1 ½ cups white whole wheat flour
½ cup bread flour + extra for kneading
1 egg, whisked with 1 tablespoon water, for egg wash
dried rosemary, for sprinkling

Instructions:

  • In a large bowl, combine the warm water, sugar, and yeast. Let sit for ten minutes.
  • Stir in the salt, rosemary, seasonings, olive oil, and whole wheat flour. 
  • Add the bread flour until the dough forms a ball.
  • Knead on a lightly floured surface for about five minutes, adding more flour as necessary to prevent sticking, until smooth.
  • Place the dough in a lightly greased bowl and cover with a damp paper towel.  Let rise until doubled in size, about an hour.
  • Punch down the dough and form it into a round loaf.  Place on cornmeal-dusted parchment paper.  Cover and let rise until doubled in size, about 45 minutes.
  • Meanwhile, preheat oven to 400 degrees.
  • Once the dough has risen, brush gently with egg wash and sprinkle with dried rosemary, and if you like, a little sea salt.
  • Bake for 20-25 minutes until golden brown.
  • Serve with seasoned olive oil, for dipping.
I got this recipe from A Hint of Honey. I would kind of like to go find her and kiss her.  But I don't know where she lives and that would probably freak her out.  So instead, I'm telling all of you to go give her some virtual love on her blog.

I'm not going to lie, I totally did not go out and buy bread flour or whole wheat flour.  I used plain old Gold Medal All Purpose flour, and this bread is still the best thing I've ever tasted in my life.  Also, I used 2 tablespoons of dried rosemary, because I freaking love rosemary.  Other than that, I did everything according to the recipe above, and the result was pure heaven.  I don't care how scary a bread recipe seems, if I can make this recipe, so can you.  And you should.  Because it's wonderful.


 Peach Sangria

Ingredients:
1 large bottle Sutter Home White Moscato
1 bottle Tropicana Peach-Mango Juice
1 package red raspberries
1 lime, sliced into quarters
1--1 1/2 cups Sprite

Instructions:
The night before you plan to serve the sangria, combine the wine, juice, raspberries, and lime quarters in a large pitcher.  Refrigerate overnight.  Just before serving, add the sprite.  A little vodka or Triple Sec can also be added to make the drink a little more boozy, but we had it without and it went down just fine.


Blueberry Pom Sangria

Ingredients
1 large bottle Sutter Home Sweet Red Moscato
1 bottle Tropicana Blueberry Pomegranate Juice
1 package strawberries, halved
1 lime, sliced into quarters
1--1 1/2 cups Sprite

Instructions
The night before you plan to serve the sangria, combine the wine, juice, strawberries, and lime quarters in a large pitcher.  Refrigerate overnight.  Just before serving, add the sprite.  Again, a little vodka or Triple Sec can also be added to make the drink a little more boozy, but we liked it without.


So there you go!  All the recipes I promised you.  If you liked them, please repin them on Pinterest, share this post on Facebook, and don't forget to like RHW on Facebook to stay in the loop!

The Dinner Party

Oh my gosh, guys.

I have been SO freaking busy these past two weeks!  So if you haven't liked me on Facebook (which you should really go do, by the way), then you haven't heard from me in a while. If you've missed out, let me bring you up to date.

You missed Convos With My 2 Year Old, an adorable Canadian dad who re-enacts hilarious conversations with his tiny human on film.  Only he makes them more hilarious because he replaces his daughter with a full-grown man.  I spent two solid hours of my life watching their videos the other day.  No regrets--it was time well spent.  You need to go watch The Cookie (my personal favorite), and then like them on Facebook, too.

You missed the preschool ice cream frozen yogurt social, and Gavin's weird apple-kiwi-strawberry-gummy-worm concoction:

Photo: School social at a frozen yogurt shop... The tiny human chose apple pie yogurt, topped with  strawberry boboas, kiwi, and gummy worms. Whatever floats your boat, I guess. 

You also missed my awesome friend Megan's burlap wreath!  She made one after I posted the tutorial, and I actually like hers more than I like mine!


Jessica finished hers as well.  She actually finished hers the day of my original blog post, but it was a wedding present for someone else, so we had to keep it a secret!


Also, Gavin had his school pictures taken.  He modeled for Jessica the morning of and looked super suave and adorable:

And of course, DH (darling husband, for those of you not up on the cool, hip lingo), had his 23rd birthday:


Also, one last thing.  My blog exceeded 10,000 page views this week.  Please recall that on September 22nd, I was excited about 3,500 page views.  Yes.  That was seven short days ago.  I believe the exact number when I started this post was somewhere around 11,400.  So thanks.  You guys are all amazing for reading my stuff, and putting up with my occasional lapses in posting.  I love you.  Yes, even the one weird person who reads me in Australia.  Actually, especially you, because I bet you have a great accent.

Anyways.  There.  Now you're up to speed, and you can stop being confused about why this post is called The Dinner Party.

So I had a rather rough week this week.  (More info on that to come at a later date.)  When I'm in a bad mood, I cook like a person possessed.  Some people clean, some people drink, some people eat lots of chocolate and watch trashy TV... I cook.  Then I have all this food lying around and Jimmy and I get fat.  On top of this, friendboss Courtney and roommate Jessica just completed a giant, scary school project this week, which of course seemed like the perfect excuse to drink.  Thus, the game/drinking/dinner night was born.

Somehow, in my cooking fervor, the night evolved into a Pinterest-inspired appetizer dinner kind of thing.  On the menu were crockpot meatballs, ranch crackers, caprese pops, rosemary olive oil bread, onion dip with chips and crackers, mozzarella sticks, cookies and cream cake (leftover from Jimmy's birthday), cookies, a delish hot ham and cheese pinwheel that Courtney made, and two big, glorious pitchers of sangria.

Don't you worry.  Recipes will be provided in a post soon to follow.  I put my productive panties on and put together the recipe post already.  It can be found here.


The sangria.


THE bread.  I love this bread.  If I didn't already have Jimmy, I would marry this bread.  I could probably live off this bread and the sangria and nothing else for the rest of my life and be happy.  (Of course I'd die a lot sooner due to diabetes and a shot liver, but I'd die happy, so whatev.)


There's a lot going on in this photo.  The main focus is the platter of caprese pops.  But you can also clearly see an empty wine glass (probably the only time THAT happened the whole evening), a platter of wonderfully spicy habañero cheese that Courtney brought, the ranch crackers that disappeared before I could take a picture of them, and in the top right corner, the white wine sangria.  Does anyone else want to eat their screen?


My breakfast this morning.  Some leftover bread with olive oil dipping sauce, and the last surviving caprese pops. 

Also, I feel like I need to showcase our decorations.  Jessica came over early to help me set up, and we got my entryway all glammed up for fall.  I'll post about this too, don't worry!


The full effect.


The mice and pumpkins on the stairs (except two are missing, because the dogs think the tiny pumpkins are there for their entertainment purposes, and also that they taste good).


And the only time I'm cool with spiderwebs inside my house.

Jimmy and I have spent the day recovering in our PJ's.  The house needs cleaning up (again), and there are dishes to do, and dinner to be made.  But for now we're just calling it the evidence of a good evening, and snuggling the pups on the couch.

Coming up this week, I get to make paper-mache pumpkins with four-year-olds, gear up for some FRG projects that we're pretty excited about, and I have some cool things to tell you about on Totally Obsessed Tuesday.  Don't miss a thing and go give us a like on Facebook (and then hit the share button!)

That's all for now.  Mischief managed.

Wednesday, September 18, 2013

Wreaths and Shenanigans

Happy Wednesday!

I know, I failed this week--I didn't post a Totally Obsessed Tuesday. BUT.  I have a really good reason!  I was working on a project yesterday, and now I can bring you a lovely tutorial on how to make your own burlap rag wreath.

Last week, I did a whole song and dance about fall decor.  Well, Jessica, friendboss Courtney's roommate (who I don't talk about very often, but I should, because she's just as awesome as Courtney), saw the burlap wreath, and decided she wanted to make one.  So off I went to the Happiest Place On Earth (Hobby Lobby, for those of you who don't know me well enough) to pick up some supplies.

You'll need one wire wreath, like this one.  I found it at Hobby Lobby for $3 in the floral section.

I was a little dumb, and forgot to take a picture of the burlap ribbon before I cut it to shreds.  But I found that at HL as well, near the floral section, and I believe each roll was around $7.  I will warn you--I originally bought three rolls. Then Jessica had to go out and buy three more... And that STILL was not enough to complete two wreaths.  It takes a LOT of burlap.  For one wreath, I would say start with four 15 foot rolls. (I promise it's worth it in the end!)  Poor Jessica's still isn't done because she ran out of burlap at 10 last night and HL was closed.  There was even a desperate, middle of the night run to Wal-Mart and Target, but they failed us, and had no burlap.  If she gets it done today and is happy with it, I'll try to get a picture of her wreath too.

To decorate our wreaths, I also picked up some wooden letters, some fake leaves (which actually came from the dollar store, as did the ribbon), some scrapbook paper, and some paint.  You'll see all these in a minute.

The most annoying part by far was cutting the burlap into ribbons.  THIS IS A MESSY PROCESS.  You WILL be covered in burlap fuzz.  It itches.  Wear long pants and be prepared to clean up after.  Also, see in the photo how the burlap is woven?  Some of the little strings will start coming off, and you'll think it's the end of the world. It's not.  It looks fine once it's done. It's kind of messy.  But they call that shabby-chic, or something, right?  Messy is in.

Okay.  So, gather up all you stuff, and then cut the burlap into ribbons.  Mine were probably an inch wide, and however tall the burlap ribbon is. (Yep, I should have measured.  Oops.)  I suggest doing all the cutting at once, because you sort of get on a roll with the tying.

Then you're ready to start tying the ribbons on.  Seriously, just take a ribbon, and tie it in a single, simple knot around one of the wires. Then, keep going.  I tied from right to left, starting at the inside wire, if that makes sense.

It WILL look like a hot mess for a while.  For the first 20 minutes or so, I sat there thinking Oh Lord, what did I get myself in to...?  But I swear, it turns out great.  It starts to look better the more you do. 


You'll need to kind of squish the burlap together after you finish each row, or it comes out looking too sparse.  It probably took me around two hours total to get all the burlap tied on.  I did it mostly while Gavin was napping.

Then it's time to get on to decorating.  I picked up a nice wooden letter "R," some brown paint, and some cute paisley scrapbook paper for mine.  First, I painted the R (top and sides) in the brown paint and let it dry.

Yes, I know this is an S. I forgot to take a picture of my letter, so this is Jessica's.

Then I traced the R onto the scrapbook paper and cut it out.  (This took two tries, because the first time I was dumb and did it backwards.  This is what happens when you improvise.  Trial and error).  Then it was time to use some of my favorite-ever products.

First, I mod-podged the scrapbook paper onto the R.  I have a can of spray adhesive I could have used, but I find that to be messier most of the time.  Then, once the paper was secured on to the wood, I covered it in a layer of poly.

I picked this up at Lowe's in the flooring department ages ago.  It makes a nice, hard seal over the scrapbook paper, and adds a little bit of shine.  I wish I could poly my whole life--once you coat something in poly, you can just wipe it with a damp cloth to clean it.  Imagine being able to do that to your couch.  Your clothes.  Your dogs.

Yes, it's a recurring fantasy I have when I'm cleaning.

Back to business.  Make sure the poly is WATER based.  They have an oil base as well, and I think it's cheaper, but that has sort of a yellowish tint to it and doesn't look as nice.  I did a coat of poly to protect my letter from the elements since it'll be hanging on the front door.  Also, it makes a nice hard surface over the paper so it won't fade or get rubbed off over time.  (I made coasters out of scrapbook paper months ago using this same poly, and my coffee is sitting on one of them as I write this.  This shit is durable.)

http://distilleryimage4.ak.instagram.com/7a46af00207111e3b79d22000a9e5e12_7.jpg

 Ta-da!  A pretty letter.  To put it on the wreath, I just used hot glue.  For a while, I debated ways to get it on there so it would still be removable, so I could change the theme of the wreath with the seasons.  Then Jessica and I decided to just repeat our crafting day three more times and make different wreaths for each season, since we kept finding more adorable ones on Pinterest.  So hot glue it is.

Since I decided to make this a "fall wreath" for real, I added in a few of the fake leaves as well.  My original idea was to have the letter kind of sitting on a spray of leaves, but the paper and the leaves kind of clashed.  So I just spaced them out around the rest of the wreath (burning myself like fifteen times in the process, which I always do when I use hot glue).

Aaaaand DONE.  I was going to hang it with ribbon, but the ribbon I bought was the stupid kind with wires in it, and I couldn't get the wires out.  (Courtney and Jessica had a fabulous time laughing at me as I tried--and failed--to pull them out with my teeth.)

I think I did a pretty bad-ass job!  It's simple, but very cute for fall.  I'm in love with it.  Please excuse my ugly front door.  It's a rental door and I can't do anything about it.  Which is why I needed the wreath.

Hope you liked the tutorial.  If you were inspired to make a wreath of your own, send us pictures!  I'd love to see.

Now I have to go wash off more burlap fuzz.  In the meantime, while you wait with baited breath for my next post, go like my Facebook page.  I finally bit the bullet and created one, so go give us a thumbs up!

Wednesday, September 11, 2013

Better Than We Were Before


I've been thinking a lot today.

It's 9/11, so I think a lot of other people have been thinking a lot today, too. 

We've been thinking about the lives lost.  Karen over at Baby Sideburns posted a list of the fallen, in its entirety, from Gordon M. Aamonth, Jr. to Kristin Gould White.  (You can see that haunting list in full here)  We've been thinking about the friends, families and loved ones left behind.  We've been thinking about the heroes who dealt with the aftermath, like the police, firefighters, and paramedics--some of whom were quite surprising.   We've been thinking about the heroes who finally found the man who was responsible for all of this.

But I've been thinking about something else.

Does anyone else remember how together we were, right after?  How united we were, as a country.  People attended candlelight vigils for people they didn't even know.  We hugged each other in the streets.  We stuck up for strangers.  We committed thousands of random acts of kindness because in the throes of that tragedy we felt so connected to each other we couldn't even stand it. 

It makes me terribly, terribly sad. 

Because we lost that, somewhere along the way.  We are a country more divided than ever.  We've managed to become more isolated from other human beings than we ever thought possible.  The blatant anti-Muslim racism I have witnessed just today makes me physically sick to my stomach, and it's only ten in the morning.

What happened to us?

Today, if you didn't know already, there is going to be a Thousand Muslim March on Washington.  You've probably also heard about the some 800,000 bikers on their way to Washington to confront them.  Am I the only one who thinks this is a bad idea?  Am I the only one having visions of riots in the streets?

Let me make this painfully clear--I am not condoning or supporting the march.  At least, not today.  While I do think that Muslim Americans have the right (as African Americans did in the 1960's, in case we've all forgotten) to march on Washington and protest the discrimination they're facing, I don't believe they should do it today.  Today should be about remembrance and grieving, not about politics.
How did we go from holding hands in the streets, lighting candles for the fallen, to rioting in the capital, which I truly fear we'll see by the end of the day?  I fear for my children, and their children.  I honestly do.  If this is what we've come to, only twelve years after the attacks, where will we be fifty years after?  Or a hundred?  How much hatred are we setting ourselves up for?

I'm sure I'm going to catch a lot of flack for the previous three paragraphs of this post.  Some people who read it will call me un-American, unpatriotic, a left-wing liberal nut, and a lot worse things that I won't put in print. But I didn't start this blog to keep my mouth shut, so I'm going to say the hard things that no one else is saying.

And I'm hoping, that for as many people hate my post today, there will be an equal number who sit down and really think about it.  Here's what I want you to think about.  When, fifty years from now, your grandchildren ask you how you were affected by 9/11, what will you have to say to them?  Will you tell them that the attacks made you a better person?  That you were kinder to strangers; that you valued life, any life, more, and not less; that your country came through it better than it was before?  Or will you tell them that you became bitter, and full of hate; that you became suspicious of anyone who didn't look exactly like you; that your country became unrecognizably ugly in the aftermath?

I hope, perhaps against all hope, that we can tell our grandchildren about the togetherness.  About the random acts of kindness and the hugging strangers and the everyday people who became heroes.  And I hope it won't be overshadowed by all of this ugly.

Today, in remembrance of the fallen, do something beautiful.  Buy a stranger's coffee.  Over-tip your waitress.  Write a letter to a soldier.  Let your kids have ice cream for dinner.  Do something positive and beautiful.  Honor the fallen with kindness, not with hate. 

Today, let's prove to the world and ourselves, that Americans really did come through this tragedy better than we were before.

Tuesday, September 10, 2013

Totally Obsessed Tuesday: Finally Fall!

Okay, people.  It's September.  I can say this now.

IT'S FINALLY FALL.  Sort of.  It's still 94 degrees outside and the pools are still open.  Being a Midwest girl, this is weird for me.  It SHOULD be in the mid-sixties to seventies, and the windows of the shops downtown should be painted to reflect this year's Homecoming theme.  (Yes, I am that small-town.) But whatever.  Ridiculously hot weather aside (recordbreaking in my home town, in fact!), it's fall.  I'm calling it.

Anyways, yes, I am one of those people.  For the next three months or so, I will be pinning, blogging, and posting Facebook statuses about pumpkin EVERYTHING, Halloween, fall favorites, and Thanksgiving dishes.  Don't say I didn't warn you.

Today, I only have one thing I'm Totally Obsessed with instead of my usual three--Fall Decor.  There are so many great ideas out there for decorating your home (inside and out) for fall.  Right now, I have about a million ideas of what I would like to do. If I do everything I want to, it will look like a jack-o-lantern vomited inside of my house.  In any event, today is all about the best decorating ideas I could find.

Fall Decor--Outdoors

I don't know if I've ever posted a picture of the front of my house.


There it is, in all its glory. (You can kind of see our cat, B.C., chilling in the window by the door.)  We live in a quad-plex, in one of the middle two units.  So if our neighbors decide not to decorate, our house is going to stick out like a sore thumb.  But I totally don't care.  Here are some of my favorite ideas for the front porch and door.

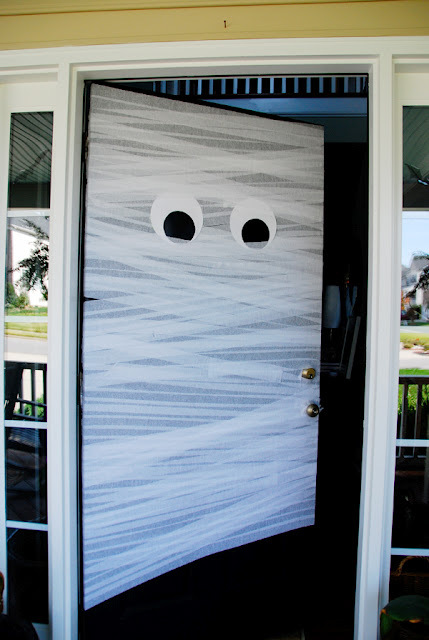
Front door mummy 

I'm a big fan of this mummy door idea, which I found at Honey & Fitz.  All it requires is some white crepe paper, some double sided tape, two sheets of printer paper, and some black construction paper or cardstock.  The original poster was able to create this look for less than a dollar.  Pretty sure this is happening.


I also love this Frankenstein's Monster door (because we all know that Frankenstein was the scientist, and his creature didn't have a name, right?  Right?!) that I found on A Girl and A Glue Gun.  Since my friendboss Courtney has a green front door, I'm pretty sure Gavin and I will be having a craft day in the near future where we recreate this look.  (My front door is white, darnit, so I'll have to stick with the mummy.)

Making a rag wreath 

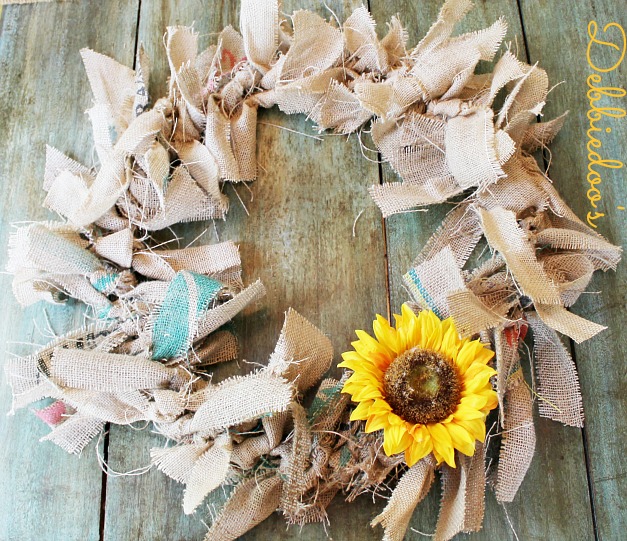
If you're not into whole-door decor (or if, like me, you're pretty sure your husband won't be), you can do a lot with wreaths.  This is a burlap wreath I found on Debbiedoo's, and as a bonus, it's super cheap and simple. If you'd rather it be a little more fall-ish, you could switch out the sunflower for a small gourd or some leaves (both of which can be found at the dollar store).

this wreath is adorable! easy to make.

If you prefer something a little more Halloween-ish for your wreath, you could re-create this ribbon wreath found on Porter Mae Designs on Etsy. I love this wreath... But I don't $90 love it, which is how much the shop owner is asking for it.  I do love it, but I could easily make it with some ribbon, a foam wreath, and a hot glue gun. Also I don't have ninety dollars.

You could also make your own wreath from a dollar-store branch wreath and some fake leaves from Hobby Lobby.  I swear I pinned something about making a dollar store wreath, and it looked fabulous, but I can't find it for the life of me and now I can't remember what blog I found it on.  Sad.  In any event, there are roughly a million pins on Pinterest about fall wreaths, so I'll cut myself off here before I go crazy.  


I lied.  I'm in love with this idea too. It's not exactly a wreath, but still. I love how SIMPLE it is, and it's still adorable.  Any idiot with some wooden letters and some ribbon could make this (although I would probably cover each letter in different fall-themed scrapbook paper).  Okay, really done with door stuff now.  I swear.

I'm also really into decorating the whole front porch this year, so I'll carry on to that.


Cute Fall Porch Decor Ideas

I love everything about this look that I found on Shelterness. I love the little bats (which can simply be made out of black cardstock and double-sided tape), and I love the collection of small gourds in the corner.  The bats would work well inside also.  If Jimmy hates the mummy idea, I might combine this with a fall wreath.

doormat 

This is easily one of the BEST DIY decorations I've found, and it actually came from parents.com.  It's literally a pool noodle cut in half, some cheap stockings, and a pair of black shoes from Goodwill.  Personally, if I do this one, I'll probably switch the colors and add some ruby slippers so it has a Wizard of Oz feel. 


The last great idea I've come across for outdoors is super simple.  Anyone can make these eyes in the bushes that Thrifty Crafty Girl made.  You simply take some old toilet paper rolls, cut out a few different eye shapes, and stick some Christmas lights in the back.  If you don't have an outdoor outlet, I think glow-sticks would work just as well, although you'd have to save this just for Halloween night.

Now do you guys see why I'm having such a hard time deciding what to do?!  Doing all of these ideas would be serious overkill, but they're all just so darn awesome!

Fall Decor--Indoors

I have to admit, I found far less indoor decorations that I loved than outdoor.  There are several reasons for this.  Number one, the inside of my house is kind of shitty.  We have crappy linoleum floors throughout the whole house, a really ugly off-white paint color in all but one room, and a kind of weird layout.  I don't particularly feel like highlighting any of these features with decorations.  Number two, only five people really ever come in our house; myself, Jimmy, neighbor Caitlyn, her husband Mike, and their two-year-old son Ayden.  Some of these ideas feel like a lot of effort to make when no one is going to see it.

Stair Decorations 

This is one idea that I'm definitely going to do, because our stairs are the very first thing you see when you open our front door.  The little mice are just made out of more black cardstock, and I bet I can find some cheap, small pumpkins at the dollar store for along the side.  This super cute and fairly simple idea came from DIY & Crafts, and since it's in a high traffic area, even the Fed-Ex delivery guy will see it.  (And the trick-or-treaters, of course.)

Flying Bats 

This is just an example of what the bats can look like inside, also from DIY & Crafts. I might do these in the entryway as well, especially if I don't do them outside.

Web Sight 

How adorable and easy is this one?  All you have to do is take some masking tape (or electrical tape if, like me, you have white floors), and create a spider web!  I will probably do this one in our entryway as well.  It's too cute and easy to pass up.  This also came from parents.com.

So there you have it.  I just vomited fall all over you.  You can find more ideas on my Pinterest, or just search around yourself.  If anyone wants to tell me which door/front porch idea they like best, please comment!  I can't make up my mind and I would love to hear your opinions. Also, if you have any other great decorating ideas, feel free to share them!

Happy Fall, everybody. :)

The Legendary Pinterest Fight of '13

Pinterest and I are kind of having a fight.  Not like a breakup-worthy fight; more of a go-to-our-separate-corners-and-cool-off kind of fight. 

The fight originated because we have two naughty dogs. Simon and River have decided that the millions of toys that we've bought them are no longer fun enough. The coolest, tastiest chew toy we possess is our couch.


This couch.  Those little specks on the floor are pieces of foam and batting that have been ripped out of the far left cushion.

Let me make one thing clear: this couch is uglier than homemade sin. I'm aware of that. However, it's a damn sturdy couch and it's nearly older than I am, so I feel compelled to save it.   This couch was bought by my Aunt Carole, and it sat in her house for several years before she gave it to my parents.  It served us well when I was growing up, right up until I moved out and my parents upgraded and gave it to me and Jimmy.

Also, we don't have several hundred dollars lying around for new living room furniture.  I probably would have let go of it long before now if we could afford a new living room set.  But, you know, we like to eat, so that option is out.

Anyways.  Now that the dogs have started to eat it (and Mom, there isn't enough bitter apple spray in the world to get them to leave it alone), I figured it was time to do something about it.

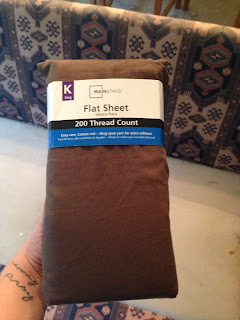
I've long been considering buying a slipcover for this couch, and our freebie couch I found on craigslist.  (It is, if possible, even uglier than this one.)  But store bought slipcovers, in my limited experience, are either really ugly, or really expensive.  So of course, I turned to Pinterest. I found a tutorial for "No-sew bedsheet slipcovers."  It only required two king size flat sheets, a pair of scissors, and some upholstery pins.


The flat sheets were thirteen dollars each at Wal-Mart, and I found the upholstery pins in the fabric section of the happiest place on earth Hobby Lobby for three dollars each.  I bought of each.  I honestly could have gone cheaper on the sheets, but these were the least expensive that I could find in a color that would match the only piece of furniture in the room that didn't need a slipcover--a brown microfiber chaise lounge that Jimmy's dad's girlfriend Monica gave us.  Still, a DIY slipcover for thirty-two dollarsisn't bad when you figure most store-bought ones are upwards of sixty.

Can I tell you a secret?

I should have just bought the damn slipcovers.

First of all, the assumption that the tutorial I followed makes is that you can cover any sofa with two king size sheets.  False.  I understand now that the likelihood is that the tutorial was assuming that the sofa would be against a wall, and the back wouldn't need to be covered.  Except, as you can clearly see, our couch is in the middle of the room, kind of dividing the room into a living room and a dining room.

First, you're supposed to take all the cushions off and cover the bottom and back of the couch with one of the sheets, and secure it with the upholstery pins.


Okay.  Check.  Did that.  Except for the little scrunched up area in the corners, which I figured I could cover when I did the arms, it looked alright.

Next, you're supposed to wrap the cushions in the other sheet.  Once again, I think there was an assumption made that only the bottom of the couch has cushions to cover.  False again.


In any event, I laid the cushions on the floor as directed.  Then, I wrapped the cushions up and battled the stupid upholstery pins secured them with the pins.

 
This part is harder than it looks.  Those pins DID NOT want to twist in to the cushions as they were supposed to.

Then I wrestled placed the cushions back on the couch.

Then on to round two, with the cushions for the back.

It was somewhere around this point that I realized that I most definitely DID NOT have enough fabric to do the arms. So I wrapped the top cushions with that was left of the fabric.

Did I mention how hard it was to secure the upholstery pins?

That would be the safety pin I used when I gave up on the upholstery pins.

So now, the couch looks like this:

I'll be the first to admit that it looks more than a little ridiculous.  At some point, I'll go back to Wal-Mart and get another sheet (hopefully a twin should do it).  But for now, it HAS stopped the---

Okay.  Literally, I was writing this post at work, and planned on finishing it at home.  When I got home, all

six cushions were on the floor, the sheets were in a tangled knot, and the dogs were hiding from me under the kitchen table.

So I think Pinterest and I still aren’t speaking to each other.